
LEMMI16s
Documentation and user guide
Last update: 2023/01/13, lemmi16s version is 1.0.0
Table of content:
About LEMMI16s
How to use LEMMI16s standalone
- Step 1: Setup of the standalone LEMMI16s pipeline
- Step 2: Defining benchmarking instances and runs
- Step 3: Exploring the results
How to benchmark your own methods
# In short
# About LEMMI16s
# In short

# What does LEMMI16s do?
LEMMI, A Live Evaluation of Computational Methods for Metagenome Investigation, is an online resource and pipeline dedicated to the continuous benchmarking of newly published taxonomic profilers for metagenomics, available at https://lemmi.ezlab.org/ (opens new window). LEMMI16s is a sister resource focused on the use of amplicon sequencing instead of metagenomics, evaluating computational methods dedicated to profiling the resulting microbial communities.
LEMMI16s generates scenarios (we call them instances) that represent a given biological situation (e.g. type of organisms) and specific resources used (e.g. reference database). It evaluates how candidate tools can solve them. Solving here means providing the abundance profile of all taxa that can be identified in the sample.
It uses a container-based approach and exploits the ability of many methods to build a custom reference database to compare them under identical conditions. By using publicly available data to generate benchmarking samples, it is reactive and flexible. Public sequences are always divided into a test (i.e. sample) and a training (i.e. reference) set to avoid overfitting.
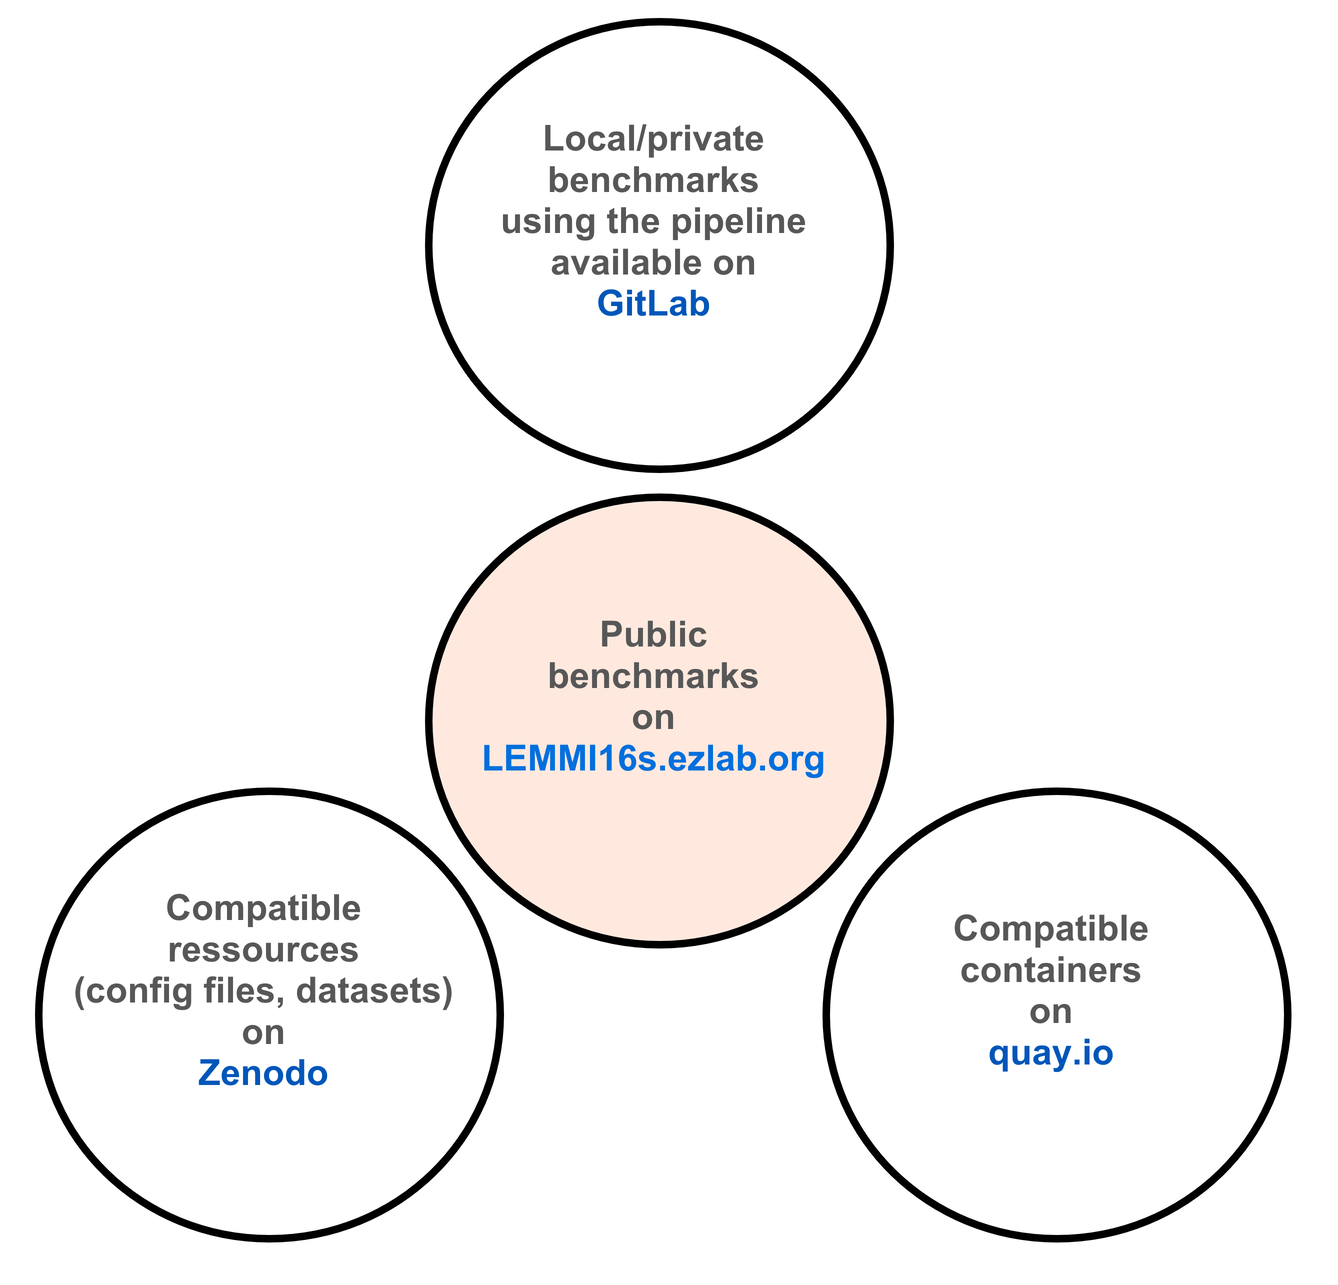
LEMMI16s is available as a standalone pipeline for private benchmarking and/or to help prepare tools for a submission to the LEMMI16s online benchmark. While the LEMMI16s team surveys and benchmarks tools, we strongly encourage developers to take the lead and request an independent evaluation of their tool after they have made it compatible. We also encourage developers to contact us with suggestions; we do independent benchmarking, but aim to optimise the tools we evaluate so that our platform reflects the best users can get.
The goal of LEMMI16s is to maintain an up-to-date catalogue of method implementations that represents what is truly accessible to users to date. Appearing in LEMMI is an indication that a method implementation can be set up on standard/independent computing environments. We aim to re-evaluate established methods frequently; new software releases, even if they do not implement a change in the core method, may affect the outcome of analyses.
# What do I find on lemmi16s.ezlab.org?
Several benchmark instances maintained by the LEMMI16s team. We are method users and do not develop tools in the evaluated category; they are all evaluated under identical conditions in our computing environment. The benchmark instances are listed on the platform landing page. An instance is a set of in silico samples. Some samples are used to calibrate the tool (i.e. to find the best read filter threshold that maximises performance) and the others are used for the actual evaluation.
# As a tool user
By exploring the LEMMI16 results, you can see how different tools perform in each specific scenario, with metrics such as precision and recall, but also runtime and memory consumption. You can follow links to the tool's website, git page or get the container used to run the benchmark.
# As a tool developers
Publishing a method paper is necessary, but not sufficient, to guarantee that your method implementation will remain a functional software over time, behaving well in most environments. By benchmarking on the LEMMI platform, you can demonstrate what the latest version of your software is capable of, in standardised scenarios and side-by-side with other available methods, no matter how popular and established, or novel and still confidential. You decide to submit it and we will add it to the list.
# What is the standalone pipeline for?
The composition of the samples provided on https://lemmi16s.ezlab.org (opens new window) may not be the best representation of the type of experiment you are running. The LEMMI16s standalone pipeline allows you to design your own benchmark and directly evaluate how existing tools will perform on it.
As a tool developer, you will also need to run LEMMI16s yourself to prepare it for evaluation on our platform. It will be informative during development to run it against established tools that are directly available as LEMMI16s containers, without the need for installation and configuration.
Finally, it ensures the reproducibility of evaluations.
# Why use only containers?
Wrapping everything in a software container reduces the risk of incompatibilities and conflicts. It ensures that two runs at two different times and in two different environments are based on the same version of all dependencies. It allows a very simple load, run and unload procedure, while isolating the run so that memory and runtime can be easily tracked. In some cases, however, containers need to be rebuilt for specific hardware. We provide the sources for all containers for this purpose.
# What are unknown taxa ?
In the context of LEMMI16s, unknown taxa are organisms for which no 16s sequence of the same taxon is provided to the tool for building a reference. Including some of them in the sample makes it more challenging and realistic to better identify methods that do not over-classify.
# How does LEMMI16s prevent over fitting on public data?
Starting with the sequences defined as source material (see config file below), LEMMI16s excludes the sequences used to generate reads from the set of sequences provided as reference.
# How to use LEMMI16s standalone
-
Before we start, a word about how we name our software containers. It is always name:tag where the tag is vX.x_cvY, e.g. lemmi16s_master:v1.0.0_cv1 or kraken_213_lemmi16s:v1.0.0_cv1. For candidate tools like Kraken, the version is part of the name, kraken_213 for 2.1.3. The tag represents the version of LEMMI16s it is compatible with, 1.0.0, and cv1 is used to keep track of the different builds of the container in case it needs to be rebuilt for debugging purposes. Therefore, each new version of a given tool will have a new container name.
# Step 1 | Setup of the standalone LEMMI16s pipeline
# i) Obtain the LEMMI code: clone the sources and set the ENV variables
git clone https://gitlab.com/ezlab/lemmi16s/
cd lemmi16s
export LEMMI16s_ROOT=$(pwd)
export PATH=$LEMMI16s_ROOT/workflow/scripts:$PATH
# ii) Install dependencies in a mamba environment
conda install -n base -c conda-forge mamba
mamba env update -n lemmi16s --file $LEMMI16s_ROOT/workflow/envs/lemmi16s.yaml
conda activate lemmi16s

# to deactivate or remove if necessary
conda deactivate
conda remove --name lemmi16s --all
-
It is assumed you can use conda and have it installed.
# iii) Container engines
LEMMI16s runs candidate tools as containers, as well as some internal tasks in what is called the "LEMMI16s master" container.
You need to install Docker (opens new window) or Singularity (opens new window)/Apptainer (opens new window).
-
The Singularity project has split into SingularityCE (commercial) and Apptainer (free). Snakemake supports both as of version 7.8.3. LEMMI has been tested with Singularity, but it is assumed that the Singularity approach described here also works with Apptainer.
No specific version is recommended for Docker, LEMMI16s has been developed and tested on Docker version 20.10.5, build 55c4c88.
Singularity requires version 3+. LEMMI16s has been tested on our HPC environment with the following versions: module load GCCcore/8.2.0 Python/3.7.2 Singularity/3.4.0-Go-1.12
# iv) Main config file
cd $LEMMI16s_ROOT/config && cp config.yaml.default config.yaml and then edit with your favorite editor if you need to.
# --------
Database: "SILVA:release_138.1"
# This will define where the reads and reference come from. Pick among:
# "GTDB:latest_r214", SILVA:release_138.1
# --------
# LEMMI16s takes into account the 16S gene copy number (GCN) of the organism as reported in the rrnDB database (GCN_ref:) when simulating the abundance of organisms in the sample.
GCN_ref: "https://rrndb.umms.med.umich.edu/static/download/rrnDB-5.8_pantaxa_stats_NCBI.tsv.zip"
lemmi16s_master: quay.io/ezlab/lemmi16s_master:v1.0.0_cv1
docker_memory: 10g # max value before killing the container
-
With LEMMI16s you can choose to run all publicly available candidate tools automatically. You may not have a clear idea of how much resources they will use before you run them. Be aware of how your system handles memory congestion from containers. If you use Docker, you can limit the amount of memory that is given to any loaded container before it is killed by the container engine. If you use Singularity, please check their documentation or discuss with your sysadmin, it may involve the use of cgroups (opens new window)
# v) the LEMMI16s master container
Some of the pipeline tasks are run inside a dedicated container. Its location (Docker repository, e.g. quay.io/ezlab/lemmi16s_master:v1.0.0_cv1) is declared in the config file above. You can optionally recreate it on your system as lemmi16s_master as follows:
cd ${LEMMI16s_ROOT} && docker build ${LEMMI16s_ROOT} -t lemmi16s_master --file ${LEMMI16s_ROOT}/workflow/lemmi16s_master.Dockerfile
and use its local name lemmi16s_master in the main config file. Choose that option only if you existing container on quay.io/ezlab/lemmi16s_master:v1.0.0_cv1 does not work directely in your environment.
# vi) If using Singularity, import all containers as .sif files
All containers (lemmi16s_master and candidate tools) need to be placed as .sif files in the ${LEMMI16s_ROOT}/benchmark/sif/ folder.
The name of the file is what should be used wherever the name of a container needs to be provided. E.g. in the main config file, lemmi_master: lemmi_master would point to ${LEMMI16s_ROOT}/benchmark/sif/lemmi_master.sif.
To import a Docker image as singularity images, proceed as follows:
singularity pull dada2_126_lemmi16s.sif quay.io/repository/ezlab/dada2_126_lemmi16s:v1.0.0_cv1
# vii) Commands to run the pipeline
LEMMI16s is run by calling
lemmi16s --cores 8 # running locally on Docker
lemmi16s --cores 8 --use-singularity # running locally on Singularity
lemmi16s --use-singularity --profile cluster --jobs 8  # running on Singularity on a cluster, see below

# to catch all the logs, we suggest to proceed this way:
# logs otherwise will appear in ./snakemake/log/*.log
lemmi16s --cores 8 > out 2>&1 &
tail -f out
# or separate stdout stderr
lemmi16s --cores 8 > out 2> err &
-
Under the hood, the command will trigger multiple Snakemake pipelines. You can pass to the lemmi16s command all Snakemake standard parameters, such as --dry-run or --unlock
-
You can now test the LEMMI16s pipeline with the included demo parameters
# viii) Job scheduling system
You can run LEMMI16s on a job scheduling system following the Snakemake documentation. We tested it on Slurm. We designed the pipeline to be compatible with profiles, see https://github.com/snakemake-profiles (opens new window). We tested it with https://github.com/Snakemake-Profiles/slurm (opens new window).
You can configure the number of cpus, memory, queue, runtime, as follows, by editing the config.yaml file defined in the the profile you are passing to Snakemake. Each entry corresponds to a Snakemake rule that appears throughout the LEMMI16s workflow.
__default__:
  queue: shared-cpu
  time: 0.25

run_analysis:
  queue: shared-cpu
  mem: 20
  time: 1
# Step 2 | Defining benchmarking instances and runs
In this second step, you will create several .yaml files to define custom benchmarks.
-
The focus of this second step is to run candidate tools that are already containerized and include the LEMMI16s benchmarking script. To learn how to create such a container with your own tool, see the last section of this user guide.
# i) Defining a LEMMI16s instance
A LEMMI16s instance is a serie of samples having a similar (but not identical) composition.
calibration: # define the sample use to calibrate the tool (defining the threshold of reads to consider a taxon)
    - '001'
    - '002'
evaluation: # define the sample use to evaluatecalibrate the tool
    - '001'
    - '002'
read_length: 200  #average length
read_mean: 250    #mean
read_std: 10      #standard deviation
read_seqSys: MSv3 # see the art simulator documentation
random_seed: 1
sd_lognormal: 1.5 # sd of the distribution of the organism abundance
totalReads: 845000
max_base_quality: 35
min_base_quality: 5
QR_ratio: 20 # value, in percent, of what goes in the reads and what stay in the reference for a sampled taxon
region:
    - v1v2
evaluation_taxlevel:
    - family
    - genus
    - species
rank_to_sort_by: species # this will define how the tools are sorted on all he plots, F1-score at that level
gcn_normalization: 1
taxon:
  - s__Staphylococcus
  - s__Streptococcus
  - s__Enterococcus
  - s__Pseudomonas
  - s__Klebsiella
  - s__Acinetobacter
  - s__Escherichia
  - s__Neisseria
  - s__Moraxella
  - s__Haemophilus
  - s__Mycobacterium:unknown # use the unknown keyword to exclude it completely from reference
  - s__Salmonella
Create this .yaml file in the yaml/instances folder, for example $LEMMI16s_ROOT/benchmark/yaml/instances/skin_microbiome.yaml
When you run the lemmi16s script, an instance declaration triggers a sampling process that creates a .yaml file for each sample requested to describe its composition. For example $LEMMI16s_ROOT/benchmark/yaml/instances/samples/skin_microbiome-e001.yaml.
Each of these yaml files will then trigger another pipeline to generate all the in silico reads, which will be placed in $LEMMI16s_ROOT/benchmark/instances/instance_name/sample_name/.
# ii) Defining runs
Once LEMMI16s has generated all the samples for all the instances you wish to create, it will execute the runs. A run defines how to execute one tool for one LEMMI16s instance. Create a .yaml file as follows:
$LEMMI16s_ROOT/benchmark/yaml/runs/mytool_skin_microbiome.yaml
container: mytool # a container name or repository
instance: skin_microbiome
tmp: mytool_skin_microbiome
load_model: 0
model: none
The candidate tool container has to be a Docker repository (e.g. quay.io/repository/ezlab/kraken2_213_lemmi16s:v1.0_cv1) or a name corresponding to a local container (kraken2_213_lemmi16s) or sif file (in $LEMMI16s_ROOT/benchmark/sif/) such as kraken2_213_lemmi16s.sif.
The tmp parameter is optional. If not specified, LEMMI16s will create a new subdirectory in $LEMMI16s_ROOT/benchmark/tmp/ with the current timestamp (e.g. 1632498097) every time it is triggered. This means that any temporary files required for the runs will not be available when the pipeline is restarted. This ensures that previous tmp files do not interfere with new runs. By specifying the tmp option in a run, you force LEMMI to reuse the same tmp folder to run the candidate tool.
-
If you want to disable an instance or run that is incomplete or causing problems, you can simply change the extension of its .yaml file. LEMMI16 ignores files that do not end in `.yaml'.
# Step 3 | Exploring the results
Once the LEMMI16s pipeline has finished, all the benchmark results will be in the $LEMMI16s_ROOT/benchmark/final_results/ folder.
To explore them, call
lemmi16s_web_docker
# or
lemmi16s_web_singularity
This will start a web server running locally on your machine, on port 8080 if available.
Use a web browser to navigate the results at http://127.0.0.1:8080/ (opens new window)
-
If you are running LEMMI16s on a Singularity engine, you will probably need a privileged (root, sudo) account to run a web server like this.
# Step 4 | Make your tool compatible with LEMMI16s: an example with Kraken2
-
We will be glad to help. Create an issue (opens new window) or contact us (opens new window) if necessary.
To be compatible with LEMMI16s, your tool must be wrapped in a Docker (opens new window) or Singularity (opens new window)/Apptainer (opens new window) container. This container must be able to perform specific tasks in bash scripts triggered by the LEMMI16s pipeline, namely LEMMI16s_training.sh and LEMMI16s_analysis.sh.
If you have already chosen to distribute your tool as a container, it would be easy to add these LEMMI16s-specific scripts so that it can be benchmarked directly. You can also create a container specifically for benchmarking.
This tutorial details the creation of the Kraken2 container we used to benchmark this tool with LEMMI16s (see https://lemmi16s.ezlab.org/tools#Kraken (opens new window) for the container created and its source). We suggest you to build it, test it, and use it as a template to start your own scripts.
# Dockerfile
- Select a base image to install the tool on, or the image that already wraps the tool.
Dockerfile#L1 (opens new window)
If not present, you will need to install
bcandps, which are required for the benchmark to run properly.Then install every components that your tool depends on
Dockerfile#L18 (opens new window)
- And install your tool. Use a specific tag or commit to ensure reproducibility. Here we install both Kraken2 and Bracken2
Dockerfile#L28 (opens new window)
- Finally, we add all
.shand.pyscripts that will be described below. Note that they should be made executable withchmod +x filename.ext
Dockerfile#L65 (opens new window)
# LEMMI16s_training.sh
When called, this script will execute the procedure required by your tool to prepare a reference based on the sequences provided by LEMMI16s, which will later be used for classification. The LEMMI16s pipeline will call it as follows:
LEMMI16s_training.sh {instance name} {instance path} {database path} (load_model=0 } {model=none} training_{instance name}
-
The parameters model and load_model can be ignored.
The Python script editReference.py prepares all the necessary files for the kraken2-build script to work. It ensures that only the sequences that are available as reference for the instance (the instance is called $dataset in the LEMMI16s_training.sh script, the list of references is passed to the python script as $dataset/reference.tsv) are considered when building the reference. Once this is done, the necessary commands are called from the kraken and bracken packages. The final result is placed in the folder named database in the current folder, which is the tmp folder when LEMMI16s is running. You can name the database folder the way you want, but write the database to a folder relative to the current location to ensure it works with LEMMI16s, and reuse that name/location in the LEMMI16s_analysis script.
-
If the database used by LEMMI16s is SILVA, kraken2 will use a preprocessed taxonomy (and only that) it has obtained for SILVA when building the container (See the Dockerfile). Have a look at the $dataset/reference.tsv to judge whether your method can find all the metadata it needs for processing the reference, or it needs to obtain data from other sources in the Dockerfile/building step.
# LEMMI16s_analysis.sh
When called, this script executes the procedure required by your tool to analyse a paired-end short read sample, reusing the previously built reference.
In the example, the Kraken+Bracken analysis is run, and the result is processed with a custom script (editResult.py) to convert it to the format expected by LEMMI16s, before being copied to its final location.
The expected output format is:
#LEMMI16s
Group_ID	Size	Taxonomy
OTU_1	5923	d__Bacteria;p__Proteobacteria;c__Gammaproteobacteria;o__Pseudomonadales;f__Pseudomonadaceae;g__Pseudomonas;s__na
OTU_2	18	d__Bacteria;p__Proteobacteria;c__Gammaproteobacteria;o__Pseudomonadales;f__Pseudomonadaceae;g__Azotobacter;s__na
OTU_3	10	d__Bacteria;p__Proteobacteria;c__Gammaproteobacteria;o__Pseudomonadales;f__Pseudomonadaceae;g__Oblitimonas;s__na
OTU_4	7	d__Bacteria;p__Proteobacteria;c__Gammaproteobacteria;o__Pseudomonadales;f__Pseudomonadaceae;g__Thiopseudomonas;s__na
OTU_5	55	d__Bacteria;p__Proteobacteria;c__Gammaproteobacteria;o__Pseudomonadales;f__Moraxellaceae;g__Acinetobacter;s__na
OTU_6	14	d__Bacteria;p__Proteobacteria;c__Gammaproteobacteria;o__Pseudomonadales;f__Moraxellaceae;g__Psychrobacter;s__na
# Build your image
docker build . -t kraken2
It is now ready to be debugged/used with LEMMI16s standalone.